2015/01/13

Thunderbird syncs with Gmail Contact

Thunderbird syncs with Gmail Contact

Thunderbird is one of the popular e-mail clients on the market. As the demand for collaboration arises, Thunderbird plug-in developers have written plug-ins for both contact (address book) and calendar that can be associated with a variety of contact and calendar services such as Gmail.

Associating Thunderbird with Google Contact is feasible but it requires lots of steps. You can follow steps below to do it:

  1. Install Thunderbird’s newest build from Mozilla website.
  2. Open Thunderbird and open Tools --> Add-ons.
  3. At Add-ons Manager page’s top-right, enter google contacts and search. You will get Google Contacts 0.7.xx in the search result. Click on Install.
  4. Restart Thunderbird afterwards.Now. go to Extensions tab to the left and click on Options next to Google Contacts.i
  5. Add your Gmail account by click on Add. Then go to Experimental tab and define a time interval in Auto reload to reload if you like to sync your address book more frequently. Then click on OK to exit window.

  6. Restart Thunderbird, you will be prompted to perform OAuth 2.0. Proceed with entering password.
  7. Click on Tools --> Address Book. You will see You will see an address book: Google-username@gmail.com.

As you see, importing and synchronizing between your Gmail Contacts and Thunderbird require lots of steps. However, synchronization of contacts does not occur explicitly. You may need to watch out for any content change. Yet, restarting Thunderbird will sync trigger the sync. In case you are using Outlook, you can try EVO Collaborator for Outlook which enables you to synchronize your Gmail Contacts bi-directionally.

Thunderbird syncs with Google Calendar

Thunderbird syncs with Googlel Calendar

Thunderbird is one of the popular e-mail clients on the market. As the demand for collaboration arises, Thunderbird plug-in developers have written plug-ins for both contact (address book) and calendar that can be associated with a variety of contact and calendar services such as Gmail.

Associating Thunderbird with Google Calendar is feasible but it requires lots of steps. You can follow steps below to do it:

  1. Install Thunderbird’s newest build from Mozilla website
  2. Open Thunderbird and open Tools Add-ons.
  3. Click on Lightning and click on Add to Thunderbird.


  4. Save the add-on to a folder for later use.Click on gear icon and click on Install Add-on From File. Browse to the folder where the .xpi file was saved and click on Open

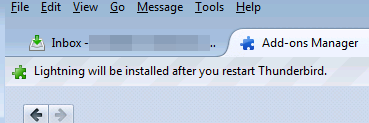
  5. Click on Install Now to continue and restart Thunderbird.
  6. Once Thunderbird restarted, click on Extensions in Add-ons Manager page.
     
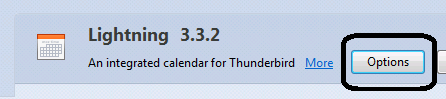
  7. Click on Options to the right and adjust your time zone.
  8. At Add-ons Manager page’s top-right, enter provider and search. You will get Provider for Google Calendar in the search result. Click on Install. Restart Thunderbird afterwards.

  9. Now. click on File -> New -> Calendar…. Select On the Network and click on Next >.

  10. Select Google Calendar and proceed with Next >. Then enter your Gmail account in the space provided and then Next >. Proceed with OAuth 2.0.


  11. Select calendar to synchronize and click on Finish on next window.

  12. You can change sync interval by selecting Manually next to Refresh Calendar:

    .
As you see, importing and synchronizing between your Gmail Calendar and Thunderbird require lots of steps. In case you are using Outlook 2007/2010/2013/2016/2019, you can try EVO Collaborator for Outlook which enables you to synchronize your Gmail Calendar bi-directionally.

2015/01/12

How to sync android with iCloud calendar / contacts (or Zimbra contacts)

How to sync android with iCloud calendar / contacts (or Zimbra contacts)

Android phones occupy more than half of smartphone population worldwide. Many of the Samsung galaxy, Sony Xperia and HTC users are asking the following question:

How to sync Android with iCloud (or Zimbra)?

These Android phone owners just barely got their new phones or they decide to try out new generation of iPhones. They are spending lots of time migrating or moving between iPhone iOS and Android back and forth. Therefore, data syncing has become a common issue along the way.

We all know that Google phones, such as Nexus, are working fine with Gmail seamlessly. However, what about cloud services such as iCloud, Zimbra, OwnCloud and etc? What if we need to synchronize Android calendars and address books with iCloud (iPhone/iTunes)?

There are two APPs that can help you out: CardDAV-sync and CalDAV-sync. 


CardDAV-sync is available at Google Play store.
https://play.google.com/store/apps/details?id=org.dmfs.carddav.Sync


It helps your Android phone to synchronize contacts with Apple iCloud or Zimbra or other generic CardDAV services.


CalDAV-sync is available at Google Play store.https://play.google.com/store/apps/details?id=org.dmfs.caldav.lib


This App makes it possible for your Google Smartphone to sync calendars with iCloud, OwnCloud or other generic CalDAV services such as EVO Mail Server Prime.

Why CardDAV-sync and CalDAV-sync are able to perform such tasks? The reason behind is that all the major cloud services are operating based on CardDAV and CalDAV protocols. You can check these APPs out on their website:
http://www.dmfs.org/ These two APPs cost you a few dollars but it is worth every of your penny.

The above solution is for users on Android platform. What about Outlook platform? What if you want to synchronize Gmail/iCloud contacts and calendars with Outlook?


You can try download EVO Collaborator for Outlook. This outlook add-in is very easy to setup and it can sync your Outlook 2007/2010/2013/2016/2019 with Gmail/iCloud account almost instantly. For any modern mobile users, CardDAV-sync, CalDAV-sync & EVO Collaborator for Outlook are 3 must-have for better productivity on the road.

2014/10/14

Three Exchange Calendar Alternative based on SabreDAV


Three Exchange Calendar Alternative based on SabreDAV


When your company is short on funds to run an Exchange Server, there are cheaper options to host your email part.
However, there are not many free mail server or affordable solution for hosting contact and calendar services for your company. There are a few options that run based on SabreDAV. You may want to try them out.
  1. Kolab –
    A Unix-like groupware offering mail, contact, calendar services. It is free and has support forum community. If you are running Unix-like environment, go for it.
  2. OwnCloud –
    A cross-platform contact/calendar/task/webdav server. It is also free based on AGPLv3 license. Many people run it at home or in office. It is a good choice if you already have a preferred email solution.
  3. Baikal –
    A very light-weight CardDAV/CalDAV server running on Apache2 with running PHP environment. Same as OwnCloud, it is free and worth a while to try if you already have an email solution.

The above are the serverpart, what about client software? There are a wide variety of choices out there. They require many steps to configure. Here is a client software called EVO Collaborator for Outlook. This Outlook add-in for 2007, 2010, 2013, 2016 and 2019 compatible with many public contact/calendar/task services such as iCloud, Gmail, Yahoo! and fruux. Yet, some of the on-premise ones are also supported such as OwnCloud, Zimbra, Baikal, EVO Mail Server, Mac OS X Server and many more.

2014/10/12

How to buy an SSL certificate? / Where to buy SSL certificate? How to install certificate for mail server?

How to buy an SSL certificate?Where to buy SSL certificate? How to install certificate for mail server?

What is a SSL certificate?

A SSL certificate is like a digital ID of an entity and it proves what we claim who we are. However, on Internet, only a SSL certificate signed by CA (certificate authority) is trustworthy.

What can I do with a SSL certificate other than an ID?

This certificate can be imported into a paid or free mail server, a web server or other type of servers. Then, PKI and SSL certificates work together to establish encrypted connections between servers and clients.

Where can I get SSL certificates?

There are many SSL certificate dealers selling different brands of certificates and prices vary accordingly. I recommend you to buy Comodo Certificates from KSoftware for $20 a piece. It is a basic SSL certificate to fit in web server or mail server puroses.

Here are a few steps to guide your through the buying process: (this example demonstrates buying a certificate for a mail server)

1.      Browse to KSoftware purchase webpage http://www.ksoftware.net/ssl_certs.html

2.      Click on Buy icon next to Comodo PositiveSSL Certificates

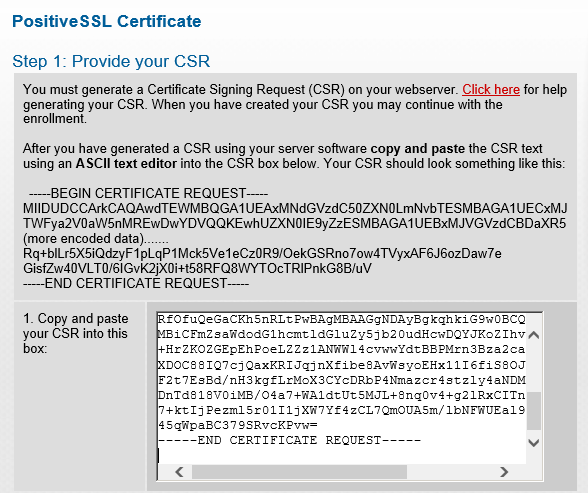
3.      Obtain CSR (Certificate Signing Request) string of an unsigned SSL certificate. Copy and paste it to the space next to 1. Copy and paste your CSR into this box. (EVO Mail Server supports auto-generating unsigned SSL certificate and its CSR for your domain.)
cert_csr

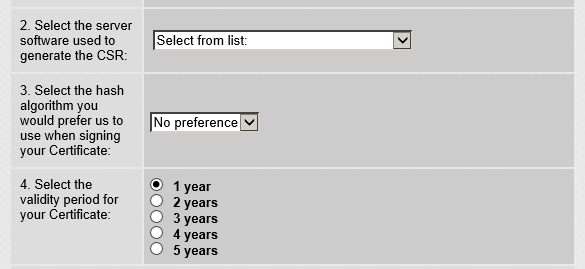
4.      At 2. Select the server software used to generate the CSR, click on the pull-down list to the right and select Apache-ModSSL
cert_2

5.      Leave 3. Select the hash algorithm… alone and go on to 4. Select the validity period for your Certificate. Do as asked.

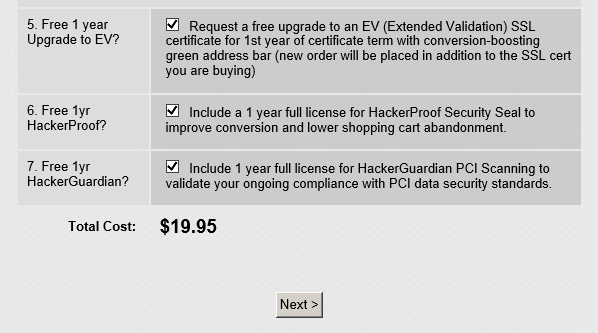
6.      For Item 5, 6, and 7, it is up to you if you like to keep it or not. Click on Next>
cert_3

.

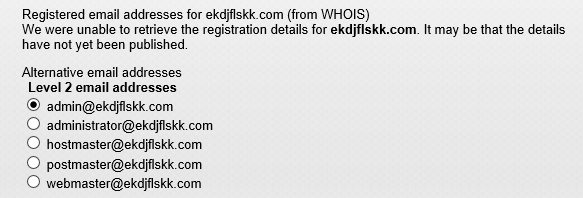
7.      On next page, select an email account, such as admin@yourdomain.com to which a domain control validation email will be delivered. Upon receiving this mail, a validation process will be performed by entering a validation code on Comodo’s website. Click Continue > to proceed.
cert_4

8.      Complete Your Corporate Details, Your Contact Details and Choose Your Admin Contact’s Management Details. The last one allows you to log in Comodo for future support. Click Continue > to proceed.

9.      Click on I ACCEPT on Agreements page. Go on to finish billing information page and click on Make Payment to wrap up purchase.

10.  Finish Domain Control Verification process and log in the email box in Step 8 to fetch the certificate.

How to install ssl certificate for website

How to import SSL certificate into Apache webserver for enabling SSL connection during Webmail session (The example below uses webmail component of Roundcube and EVOServ for demonstration):

1.     Once you retrieve the server certificate zip file, download and extract it to a temporary folder. There are two files:

a.      yourdomain.com.crt

b.      yourdomain.com.ca-bundle

2.     Download Win32OpenSSL v1.x.x and Microsoft VisualC++ 2008 Redistributable (x86). Install both of them.

3.     Proceed stripping private key password if there is any as below: a. Start a command prompt b. key in cd c:\evoserv\appserv\apache2.2\conf\certificate c. key in openssl rsa –in yourdomain.com.key –out cert.key d. At the prompt of Enter pass phrase for yourdomain.com.key, enter private key password e. Then, writing RSA key message means password stripping successful and export a file called cert.key f. Rename cert.key to yourdomain.com.key and overwrite the original one.

4.      Edit C:\AppServ\Apache2.2\conf\httpd.conf

a.      Download sample httpd.conf and extract the zip file to C:\EvoServ\AppServ\Apache2.2\config\

b.      Open C:\EvoServ\AppServ\Apache2.2\config\httpd.conf with Notepad.exe

c.       Use Ctrl+F to find strings and modify.

d.      ServerAdmin x1@x2 → replace x1 with username, x2 with domain name, i.e. admin@yourdomain.com

e.      ServerName x → replace x with server hostname, such as  mail.yourdomain.com

f.        ServerAlias x → replace x with server alias, such as webmail.yourdomain.com

g.      ErrorLog "logs/x-error.log" → replace x with server hostname, such as mail.yourdomain.com

h.      CustomLog "logs/x-access.log" → replace x with server hostname, such as  mail.yourdomain.com

5.      Edit C:\AppServ\Apache2.2\conf\extra\httpd-ssl.conf

a.      Download sample httpd-ssl.conf and extract the zip file to C:\EvoServ\AppServ\Apache2.2\config\extra\

b.      Open C:\EvoServ\AppServ\Apache2.2\config\extra\httpd-ssl.conf with Notepad.exe

c.       Use Ctrl+F to find strings and modify.

d.      Change line12: ServerName x:443 → replace x with server hostname, such as mail.yourdomain.com

e.      Change line13: ServerAlias x → replace x with server alias, such as webmail.yourdomain.com

f.        Change line14: ServerAdmin x1@x2 → replace x1 with username; x2 with domain name, such as admin@yourdomain.com

g.      Change line16: TransferLog - logs/x-access.log → replace x with server hostname, such as mail.yourdomain.com

h.      Change line20: SSLCertificateFile - certificate/x.crt → replace x with your exact domain name, such as yourdomain.com

i.        Change line21: SSLCertificateKeyFile - certificate/x.key → replace x with your exact private key name, such as yourdomain.com

j.        Change line22: SSLCertificateChainFile - certificate/x.chn → replace x with your exact domain name, such as yourdomain.com

6.     Restart Apache. Run a browser and key in URL as below: https://yourdomain.com/roundcube

How to buy an SSL certificate, is it free?


How to buy an SSL certificate?

What is a SSL certificate?

A SSL certificate is like a digital ID of an entity and it proves what we claim who we are. However, on Internet, only a SSL certificate signed by CA (certificate authority) is trustworthy.


https port

What is the number of https port? It's usually 443 if you are running a web service.

What can I do with a SSL certificate other than an ID?


This certificate can be imported into a mail server, a web server on a https port or other type of servers. Then, PKI and SSL certificates work together to establish encrypted connections between servers and clients.

Where can I get SSL certificates?


There are many SSL certificate dealers selling different brands of certificates and prices vary accordingly. I recommend you to buy Comodo Certificates from KSoftware for $20 a piece. It is a basic SSL certificate to fit in web server or mail server puroses.

Here are a few steps to guide your through the buying process: (this example demonstrates buying a certificate for a mail server)


1.      Browse to KSoftware purchase webpage http://www.ksoftware.net/ssl_certs.html

2.      Click on Buy icon next to Comodo PositiveSSL Certificates

3.      Obtain CSR (Certificate Signing Request) string of an unsigned SSL certificate. Copy and paste it to the space next to 1. Copy and paste your CSR into this box. (EVO Mail Server supports auto-generating unsigned SSL certificate and its CSR for your domain.)


4.      At 2. Select the server software used to generate the CSR, click on the pull-down list to the right and select Apache-ModSSL

5.      Leave 3. Select the hash algorithm… alone and go on to 4. Select the validity period for your Certificate. Do as asked.

6.      For Item 5, 6, and 7, it is up to you if you like to keep it or not. Click on Next>.
7.     On next page, select an email account, such as admin@yourdomain.com to which a domain control validation email will be delivered. Upon receiving this mail, a validation process will be performed by entering a validation code on Comodo’s website. Click Continue > to proceed.
8.      Complete Your Corporate Details, Your Contact Details and Choose Your Admin Contact’s Management Details. The last one allows you to log in Comodo for future support. Click Continue > to proceed.

9.      Click on I ACCEPT on Agreements page. Go on to finish billing information page and click on Make Payment to wrap up purchase.

10.  Finish Domain Control Verification process and log in the email box in Step 8 to fetch the certificate.

How to install SSL Certificate on mail server?


How to import SSL certificate into a paid or free mail server? (Here, we use EVO Mail Server for our
example)

1.      Once you retrieve the server certificate zip file, download and extract it to a temporary folder. There are two files:
      a.      yourdomain.com.crt
      b.      yourdomain.com.ca-bundle

2.      Open EVO Mail Server GUI and browse to Setting page and scroll down to 6. SSL(TLS) Certificate and Private Key Setting.

3.      On both SSL Certificate(X.509) and SSL Cert Chain(X.509), click Import respectively to the right and browse to the temp folder where you keep the server certificate files.

4.      While browsing, set file extension at lower-right to X.509 (*.*). For SSL Certificate(X.509), select yourdomain.com.crt; for SSL Cert Chain (X.509), select yourdomain.com.ca-bundle.

5.      Go to Status page, look for 2. Network setting status and you should see SSL Cert. & Key should be: passed, certificate loaded, CN value yourdomain.com verified