In this year of 2021, more and more jobs require people to work from home due to COVID-19 pandamic. Syncing calendar, contact and task remotely from home in order to cope with colleagues has become an issue for those who have not done this before.
This following article is from blog website of EVO software production. I found it very useful so I wrote them and wondered if I can trasnfer it here FYI. Then, they replied yes. So, here we go: (BTW, I walked through procedures and steps in this article and they all worked as they should)
In year of 2019, how to synchronize Synology Contacts, Calendar and Tasks with app like Outlook?
|
| Synology NAS |
As Synology announced its
DSM 3.2 support of running CardDAV CalDAV services on its
NAS product line back in Sept. 7, 2011, everyone in various forums and discussion groups rejoiced. However, if you search “caldav” keyword in Synology Community,
most threads of over 80 pages search result for the past almost 8 years are asking how to make CalDAV work as it should even for today’s most recent
DSM 6.2 system software. Yet, the only thing that still works is syncing CardDAV contacts with various syncing tool or devices because I hardly heard complaint about CardDAV’s functionality in Synology NAS. Previously in 2014, we wrote an article about how to sync Outlook contact, calendar and task with Synology’s CalDAV and CardDAV. During the past years, Synology has been revising its DSM and stepping from DSM 5.x to the current DSM 6.2. As of today, let’s review if CalDAV and CardDAV services provided by Synology NAS are still in good shape. By the way, if you are a
Baikal user, then you need to be aware of whether newer version of DSM is still compatible with Baikal server. If you are happy at where you are, then do not bother to update to the newest DSM unless you know what you are doing and know how to shuffle things around with database, php, apache and etc. In my post 4 years ago, I also put down how to sync Baikal server on Synology with Outlook. In case you missed that,
check it out.
Syncing tools that used to work
After
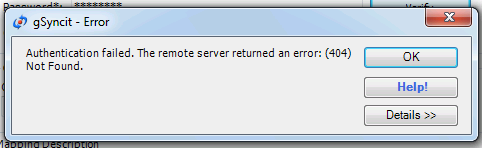
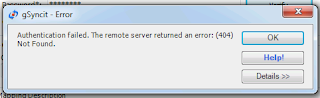
EVO Collaborator for Outlook started to support Synology syncing with Outlook Contact and Calendar back in late 2014, other syncing tools of the same sort gradually started supporting it too, such as gSyncit. Back in the old days, most of the syncing tools were working. As of now, gSyncit is
not able to detect server URL and return
(404) Not Found error message:
|
| gSyncit 404 Not Found error |
Yet, at the beginning of 2019, one of our customers reported that syncing Outlook calendar with Synology’s CalDAV did not work. Our staff experienced the same issue in our lab, so we started to work on it in order to prevent users from facing the same problem. Just a few days ago,
the puzzle was finally solved.
From Synology’s official knowledge base…
There is a theory claiming that for every software issue reported by its user, there are actually 1000 users behind it facing the same problem but they just do not report it. Based on the theory above and complaints about CalDAV not working I saw on Synology Community, there are A LOT of Synology users waiting for a solution. Hey, SYNO! Wake up and do something about it! According to instructions on Synology’s Knowledge Base on
How to Sync Synology Calendar with CalDAV Clients, syncing calendar entries should work at breeze. Also, another article on Synology’s Knowledge Base on
How to host a calendar server using the Synology NAS provides steps on configuring CalDAV clients. However, if you actually test them out practically, both methods will fail.
|
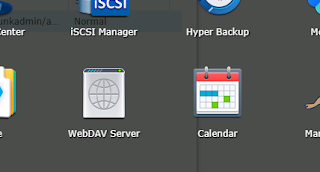
| Synology WebDAV & Calendar Package |
If you look closely on Synology’s DSM UI, you will find there are two places to create CalDAV sharing URLs. One is in Synology’s built-in Calendar app:

|
| menu to CalDAV Account |
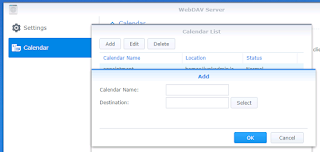
and another is in WebDAV app:
|
| WebDAV: add calendar |
These two places are also mentioned in the two Synology Knowledge Base articles above. Following steps in the articles, it ends up not working. This is how built-in Calendar URL looks like on Synology’s Knowledge Base:

|
| Built-in Calendar version of URL |
This is how WeDAV URL looks like on Synology’s Knowledge Base:
|
| WebDAV version of CalDAV URL |
The discovered fact is…
By default, the CaldDAV path locations of both Synology built-in Calendar app and WebDAV configuration are supposedly pointing to the same calendars under the same CalDAV account. Whether you access them from either Synology web-UI or other client software/device, you should see the same entries. Older versions of DSM might have the depicted CalDAV path coherency on both ends, but we don’t know. However, on the most current release of DSM 6.2, it is proven wrong after we tested our current Synology NAS in our lab. The calendars on Synology’s Calendar app and in WebDAV are actually separate entities. Yet, only WebDAV’s version of configuration works after some little tweak, which we will discuss in detail in next section.
Fix it and sync it
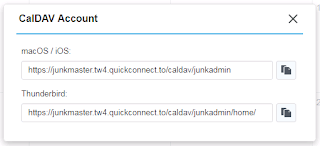
After spending hours on comparing differences of both methods on Synology’s Knowledge Base as well as actually experimenting different combination of CalDAV URL paths, hostname, ports on various CalDAV clients, we finally got it working. We will first present the working CalDAV URL path here and then we will talk about the difference between the working path and the paths taught by Synology’s Knowledge Base. The following URLs are the working ones:
- non-SSL: http://<server_hostname_or_ip>:port/homes/<user_account>/<calendar_folder>/
- SSL: https://<server_hostname_or_ip>:port/homes/<user_account>/<calendar_folder>/
The actual URLs that apply in our experiment are:
- non-SSL: http://junkyard2019.ddns.net:5005/homes/junkadmin/calendar/
- SSL: https://junkyard2019.ddns.net:5006/homes/junkadmin/calendar/
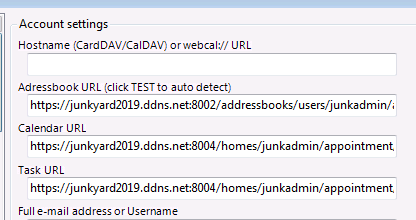
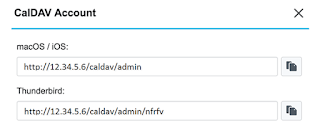
Synology’s built-in Calendar has URL path like this:
|
| Synology’s built-in Calendar URL path |
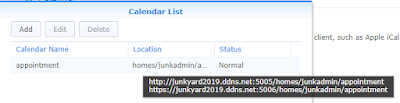
Comparing between the working URL paths and the built-in Calendar paths, let’s put server host name aside and focus on the path part. Upon browsing through Synology’s hiearachical folder tree, “caldav” is not found anywhere. It means that path here is not working at all. If it does work, then it is only valid within its own territory, not syncing outside of it. Synology’s WebDAV console has URL path like this:
|
| Synology’s WebDAV console URL path |
|
| CalDAV folder path on Synology Knowledge Base |
Comparing between the working URL, WebDAV version of URL of DSM 6.2, and WebDAV version of URL on Synology’s Knowledge Base. Let’s also put server host name aside. Even though DSM 6.2’s URL version matches the working URL, users can hardly find it unless they pause mouse cursor under Location in the screenshot. Otherwise, users would have paid more attention on Knowledge Base’s incorrect URL version. Next, the difference between two WebDAV versions is the folder path. Knowledge Base’s path is:
Captured URL is:
- /homes/<user_account>/<calendar_folder>
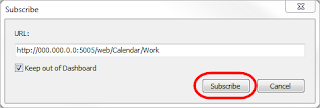
We think URL path difference is the major cause why users are not able to sync their syncing tools/devices with Synology CalDAV service because syncing tools/devices are not able to discover the new URL path according to auto-discovery scheme of
/web/Calendar/<calendar_folder> from the past. The odd thing is that the path from the Knowledge Base version was working for older versions of DSM and syncing tools have used that for years. But, for the current DSM 6.2, it is no longer valid.
Syncing with Synology CardDAV service

|
| Synology DSM CardDAV Server |
On Synology NAS, service setting is straight and simple. There is only one place for changing port number and that is all.

|
| Synology NAS CardDAV UI |
To synchronize with Synology’s CardDAV service, the server URL syntaxes of the CardDAV are below:
- non-SSL: http://<server_hostname_or_ip>:port/addressbooks/users/<user_account>/addressbook/
- SSL: https://<server_hostname_or_ip>:port/addressbooks/users/<user_account>/addressbook/
By looking at the URLs above, it is the same as EVO Collaborator for Outlook’s syntax configuration for Synology CardDAV service back in 2014. On Synology’s Knowledge Base, there are only two webpages of description on parameters in Synology’s DSM and that is all! There is entirely no instruction or whatsoever on how to configure iOS, macOS, Thunderbird, Outlook and etc. This is disappointing.
Issues on synchronizing with Synology CardDAV server
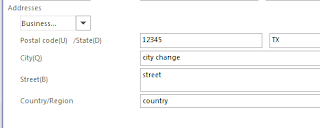
Case #1 Here is one trivial issue for your information. A majority of address books included in various mail client software applictions, such as Thunderbird, Outlook, iOS’s Mail and etc have dedicated fields for each part of a complete address.
|
| Outlook Address Before |
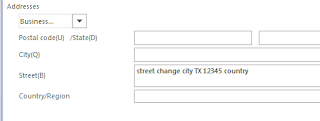
However, once contact entries are synchronized with Synology CardDAV server, all fields will be merged into a single address field on Synology’s CardDAV server.

|
| One-Line Address on Synology |
Please make sure that you DO NOT modify the address on Synology address book. Otherwise, this dramatic change will be synced back to your address book client software.
|
| One-Line Address on Outlook after sync |
As a result, all address-related fields except street on your local address book will be wiped out. What is left is the all-in-one street field.
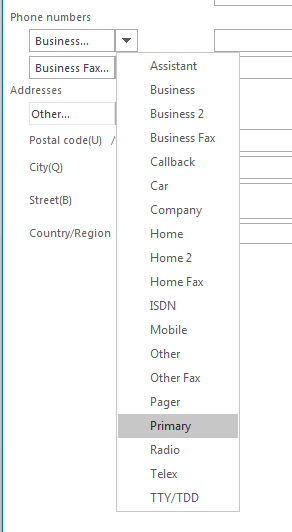
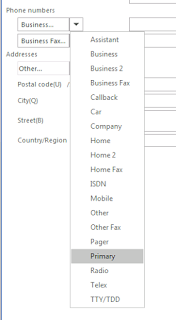
Case #2 Here is one more issue. If your client software is Outlook and like to sync with Synology CardDAV server, when you save a phone number, do not use some general phone entry, such as
Primary in this case.
|
| Outlook phone entry – Primary |
On Synology’s end, do not use general phone entry, such as
Telephone and
Preferred.

|
| Synology phone entry – Telephone & Preferred |
During our test, there are patterns like the following:
- Once Primary entry is synchronized to Synology’s address book, it was initially assigned to Telephone. If you modify Telephone entry, once the synchronization takes place, the Primary entry will disappear on Outlook.
- Telephone entry is not synchronized to Outlook at all.
- Preferred entry is synchronized to Outlook and takes Primary entry. But, if Primary entry is modified and being synced back to Synology, then Preferred entry is gone and the Telephone entry is displaying Primary‘s content. It will go back to #1 that Primary will disappear if modifying Telephone entry takes place.
- In case of both Telephone and Preferred entries exist on Synology’s address book, modifying Preferred entry or Primary entry are supposed to sync each other. But, the outcome is that Preferred will disappear and content of Primary entry will go to Telephone entry. If Telephone entry is modified, then it will go back to #1’s result.
All experiments above are like never-ending loops. Hence, to eliminate the chance of data loss, do not use these three entries or any other phone number entry that sounds general.
Syncing Synology CalDAV and CardDAV with different client software/platforms
Let’s start checking if some of the popular syncing tools can do the job on various platforms.
Syncing Synology CalDAV and CardDAV with Outlook
For both CalDAV and CardDAV of Synology to sync with Outlook, EVO Collaborator for Outlook can wrap these two tasks at once. This example covers
Outlook 2007, 2010, 2013, 2016, 2019 as well as
Office 365. Here is the step-by-step:
- Open Outlook.
- Click on Configure Profile(s).

|
| Configure Profile(s) |
- Click on Profile #21 at lower-left.

|
| Click on Profile #21 |
- Enter server host name in the fashion of:
- Sync via non-SSL connection: http://<server_hostname_or_ip>:8008
- Sync via SSL connection: https://<server_hostname_or_ip>:8443

|
| Enter server hostname URL |
- Enter username and password.

|
| Enter username and password |
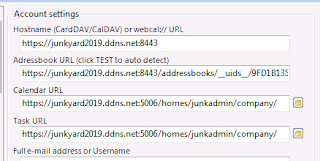
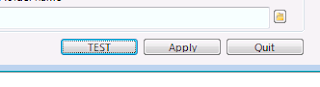
- Upon clicking on TEST button, server URLs for contacts, calendar and tasks will be auto-discovered in URL space.

|
| Click on TEST button to authenticate |
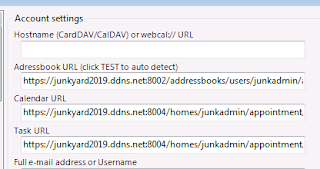
|
| Auto-discovery result |
- Also, multiple calendars and tasks are supported, so click on folder icon next to the URLs to select folders from the popup list.
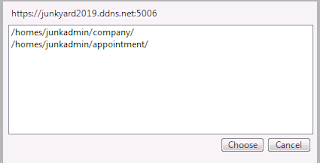
|
| Calendar/Task Folder List |
- Click on Apply button to save.
|
| Click on Apply to save |
There are a few things you need to be aware of:
- In order for auto-discovery to work under EVO Collaborator for Outlook, all non-SSL and SSL ports for CardDAV and CalDAV must be kept their default values on Synology NAS:
- CardDAV: non-SSL: 8008, SSL:8443.
- CalDAV: non-SSL: 5005; SSL:5006.
- To sync via non-SSL connection, port 8008 must be used in Server Hostname field.To sync via SSL connection, port 8443 must be used in Server Hostname field.

|
| Enter port 8008 for non-SSL connection |

|
| Enter port 8443 for SSL connection |
- If CalDAV and CardDAV ports on Synology NAS are different from their default values for some reason, then keep Server Hostname space blank and manually generate URLs according syntax rules given earlier. After entering URLs, simply click on TEST button to test it and click on Apply button to save it.
|
| Manual configuration in ECO profile |
Syncing Synology CalDAV and CardDAV with macOS
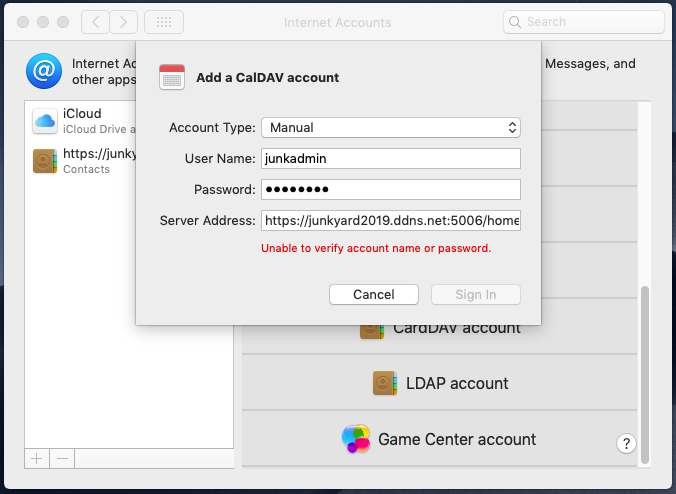
For macOS, it has always been an issue of “
Unable to verify account name or password.” for
CalDAV and
CardDAV. I googled it and found many answers. The most commonly seen possibility has something to do with
server certificate.
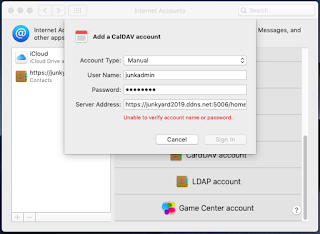
|
| Unable to verify account name or password |
Anyway, I have done a thorough test under several environments for your reference. This test tries to add Synology’s CardDAV and CalDAV accounts on
Mojave under three conditions :
- A default certificate self-signed by Synology off factory
- Import a third-party self-signed certificate on Synology
- Import a CA-signed certificate on Synology
In most cases for #1 and #2, the same error message in above screenshot would appear no matter I add them through Manual Setup or Advanced Setup in macOS. On the other hand, with #3, I can always add both CardDAV and CalDAV accounts in Advanced Setup. During trials on #1 and #2, I encountered a popup message of “
Internet Accounts (System Preferences) can’t verify the identity of the server “junkyard2019.ddns.net”.” Then, I started to pay attention on how to import self-signed certificates under macOS and let macOS always trust them. Once self-signed certificates are trusted by macOS, everything went smoothly as #3 where the CA-signed certificate was imported into Synology NAS. Now, I conclude that there are separate and necessary steps before actually adding CardDAV and CalDAV accounts in macOS:
- If using Synology’s self-signed certificate, export it to macOS:
- Export the self-signed certificate from Synology NAS to a crt file.
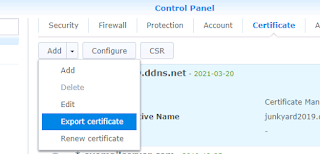
|
| Export Self-signed Certificate |
- Import the crt file under macOS.
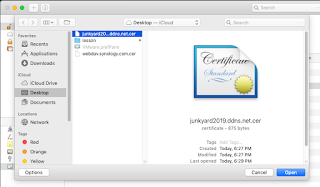
|
| Import Self-signed Certificate to macOS |
- Make the imported certificate to be always trusted.
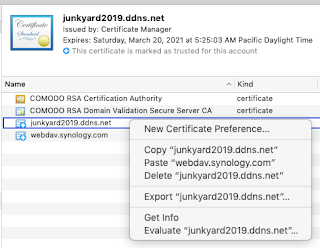
|
| Right-click on certificate and click on Get Info |
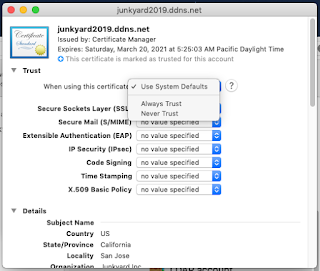
|
| Select Always Trust to override Use System Defaults |
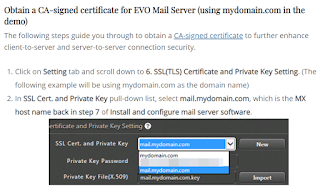
- If using an existing CA-signed certificate, import it to Synology:
- Follow steps in How to setup mail server in Windows to obtain a CA-signed SSL certificate.
|
| Get CA-signed certificate tutorial |
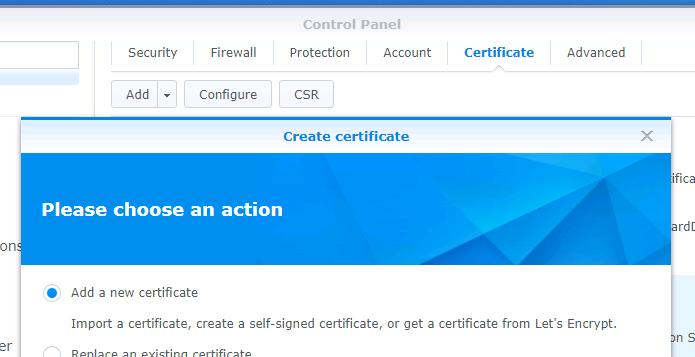
- Click on Control Panel/Security.
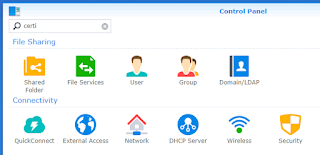
|
| Control Panel / Security |
- Click on Certificate tab.
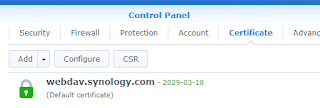
|
| Certificate tab |
- Click on Add button.
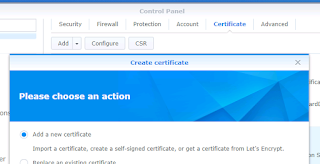
|
| Add button and Add a new certificate |
- Click on Add a new certificate and click on Next in window of screenshot above.
- Click on Import certificate and click on Next.
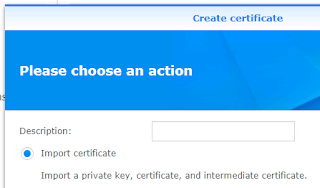
|
| Import certificate |
- Click on Browse button to browse to the folder where you save your certificate files.
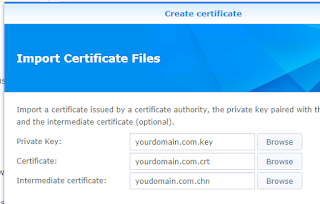
|
| Browse certificate files location and import them |
- As shown in screenshot above, respectively import Private Key, Cerificate, and Intermediate certificate and click on OK.
Once certificate import/export above is complete, in DSM, click on
Configure button and assign the dedicated certificate to
CardDAV Server and
WebDAV Server through the pull-down certificate list.
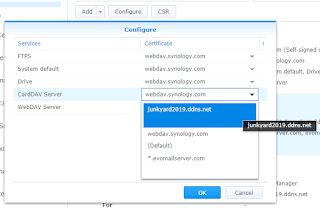
|
| Select certificate for CardDAV and WebDAV default cert |
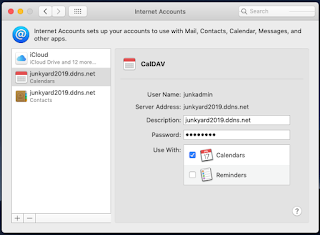
Then, proceed to steps below to configure macOS:
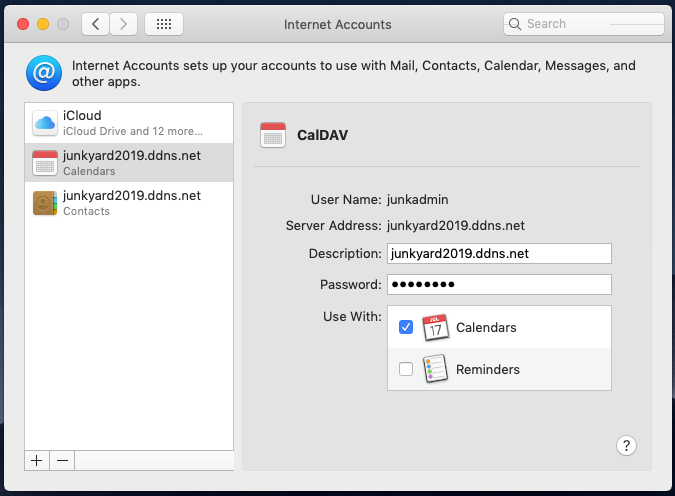
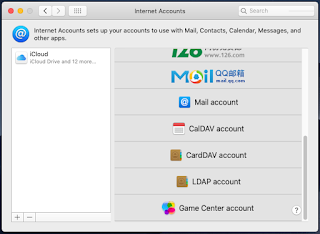
- On macOS, open System Preferences / Internet Accounts.
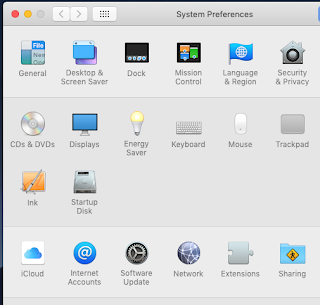
|
| System Preferences / Internet Accounts |
- Click on Add Other Account…:
- Click on CardDAV account for CardDAV
- Click on CalDAV account for CalDAV.
|
| Select CalDAV account or CardDAV account |
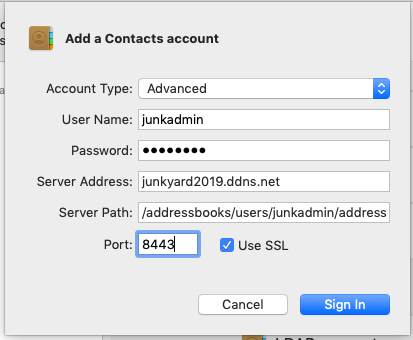
- Select Advanced from Account Type pull-down list, then enter:
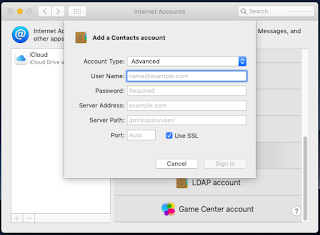
|
| Advanced Account Type |
- User Name, example: junkadmin
- Password, example: *********
- Server Address:
- format: server_host.domain.com
- example: junkyard2019.ddns.com
- Server Path:
- For CardDAV:
- format: /addressbooks/users/<username>/addressbook/
- example: /addressbooks/users/junkadmin/addressbook/
- For CalDAV
- format: /homes/<username>/<calendar_folder>/
- example: /homes/junkadmin/appointment/
- Port:
- 8443 for CardDAV
- 5006 for CalDAV
-
Use SSL: Keep it checked.
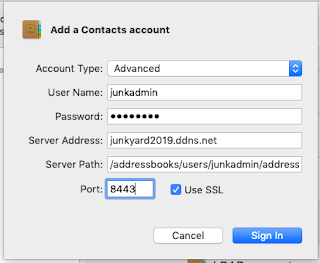
|
| Advanced settings for CardDAV |
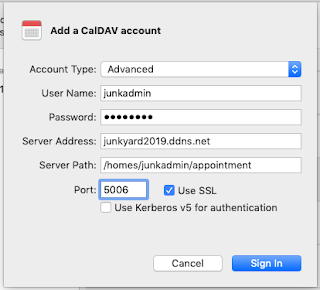
|
| Advanced settings for CalDAV |
|
| Final account added result |
- Click on Sign In to conitnue login
Here is the synchronized result:
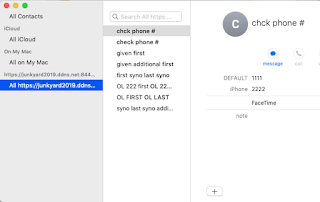
|
| Mac address book sync result |
|
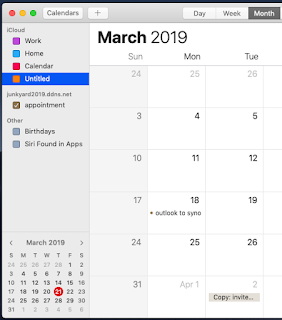
| macOS Calendar sync result |
Syncing Synology CalDAV and CardDAV with iOS (iPhone & iPad)
For the past years, Apple’s iOS on both
iPhone and
iPad is known to be the most compatible platform to sync with almost every CalDAV, CardDAV, Exchange, and other sync services on the market. In the following example, we tested
iPhone XS based on
iOS 12.2, which is the newest release yet. I cannot really remember if it is iOS 10 or 11? Apple started to force mail, CalDAV and CardDAV accounts to be created using
SSL/TLS protocol only. For the new iOS 12.2,
non-SSL protocol still will not work. For CardDAV, iOS smoothly detects server URL as soon as server (no need to enter port), user name and password are entered. Then, everything is all set.
|
| CardDAV settings summary |
For CalDAV, there is a workaround since iOS devices seem unable to find correct URL’s folder path initially:
- On iPhone, for example, go to Settings/Passwords & Accounts.

|
| iPhone Passwords & Accounts |
- Scroll to the bottom and tap on Add Account.

|
| iPhone Add Account |
- Tap on Other.

|
| Other Account Template |
- Tap on Add CalDAV Account.

|
| CalDAV Account Template |
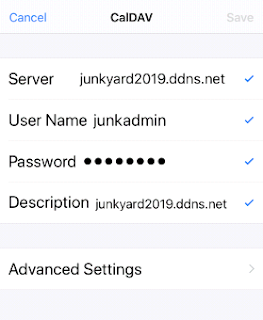
- Enter server hostname, user name and password as requested and tap on Next.

|
| Enter server, username, password |
- A warning message of “Cannot Connect Using SSL“. At the moment, tap on Cancel and OK.

|
| Cannot Connect Using SSL |

|
| Unable to verify account information |
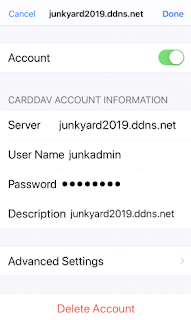
- Tap on Advanced Settings.

|
| Advanced Settings |
- iOS used to have this Account URL fully detected with no further configuration, but it is now unable to detect full URL for Synology’s CalDAV service. So, we enter complete server URL according to what we learned earlier in this article. In this example, it is:
- https://junkyard2019.ddns.net:5006/homes/junkadmin/appointment

|
| Change CalDAV server URL |
- Tap on < CalDAV at top-left shown in the screenshot above.
- Tap on Next at top-right.

|
| Tap on Next |
- There will appear check marks and next screen lets you enable or disable calendar and task.
|
| Server info verified |
- Tap on Save at top-right to save settings.

|
| Save settings |
With a little tweak, it is still possible to sync Synology contacts, calendar and tasks with iOS devices.

|
| CalDAV account summary |
Syncing Synology CalDAV and CardDAV with Thunderbird
For CalDAV, Lightning can be used to sync Synology’s CalDAV calendar. Steps are as below:
-
Open Thunderbird and make sure it is updated to the latest release, which is currently 60.5.3 at time of writing.
|
| Thunderbird website download |
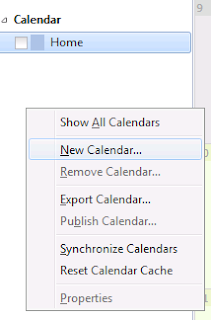
- Mouse right-click on space below Calendar area and select New Calendar….
|
| New Calendar… menu |
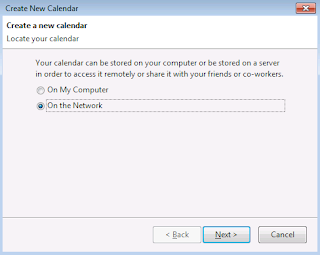
- Click on radial of On the Network and click on Next.
|
| On the Network radial |
- Click on radial of CalDAV and enter server URL according to what we learned earlier in this article and click on Next. In this example, it is:
-
https://junkyard2019.ddns.net:5006/homes/junkadmin/appointment/

|
| CalDAV radial and enter calendar URL |
-
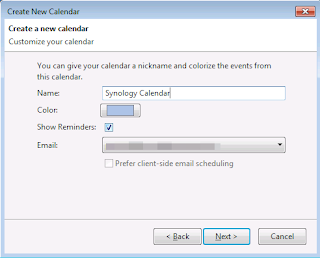
Enter a name for this calendar. Confirm Email for invitation purpose. Click on Next.
|
| Name calendar and enter email for invitation purpose |
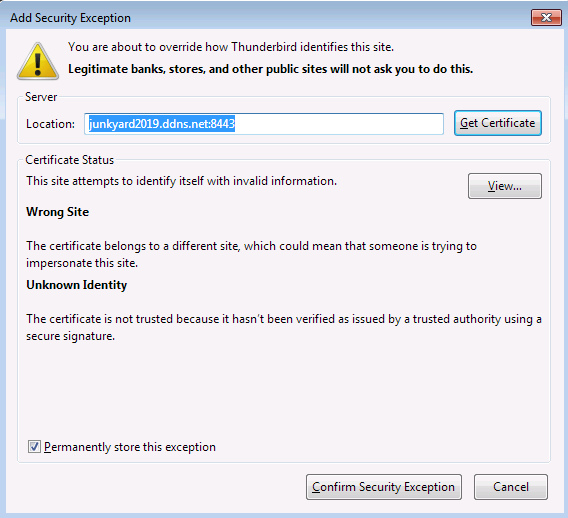
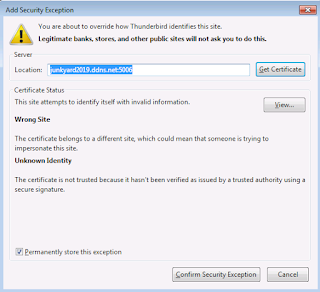
- In the popup window of Add Security Exception, click on Confirm Security Exception.
|
| Confirm Synology certificate |
- At the moment, click on Synchronize from pull-down menu to proceed synchronization.

|
| Click on Synchronize button to proceed |
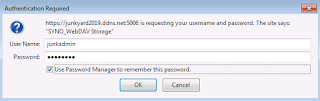
- “Authentication Required” window pops up. Enter username and password and click on OK.
|
| Enter username and password |
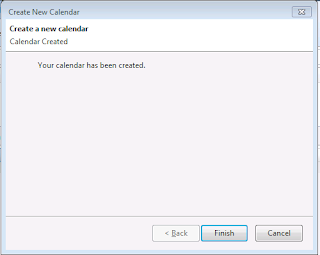
- Click on Finish to wrap up adding Synology calendar.
|
| Calendar configuration complete |
- Lastly, the sync is done.
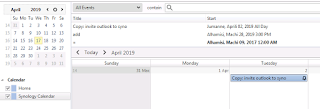
|
| Calendar sync complete |
For CardDAV,
SOGo connector for Thunderbird can be used to sync Synology’s CardDAV address book. Steps are as below:

-
Open Thunderbird and make sure SOGo connector for Thunderbird has been installed. Click on circled 60.0.2 to download.
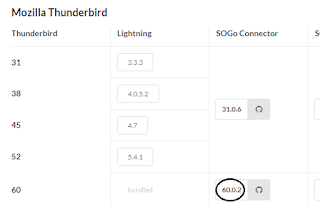
|
| Download SOGo Connector for Thunderbird |
- Open Address Book in Thunderbird.
|
|
| Click on Address book |
- Click on File at top-left and select New / Remote Address Book.

|
| File / New / Remote Address Book |
- In the popup window, enter Address Book name and CardDAV URL according to what we learned earlier in this article and click on Next. In this example, it is:
-
https://junkyard2019.ddns.net:8443/addressbooks/users/junkadmin/addressbook/

|
| Enter Calendar Name and URL |
- In the popup window of Add Security Exception, click on Confirm Security Exception.

|
| Confirm Security Exception |
-
Right-click on the calendar and select Synchronize.

|
| Click on Synchronize to proceed |
- At the moment, an “Authentication Required” window pops up. Enter username and password and click on OK.
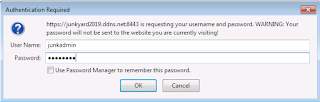
|
| Enter username and password |
- Last, the sync is done.
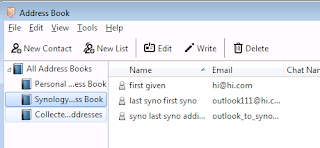
|
| Address book sync complete |
Some thoughts on Synology’s CalDAV and CardDAV feature
Synology has been a decent NAS solution for users ranging from individuals to enterprise. It is good to have such CalDAV and CardDAV features built-in so we can save some bucks from building a dedicated server for that. However, I pinned out a few flaws, such as incoherency between calendars on two locations, address fields being merged into one line, and CalDAV server URL not being updated in its Knowledge Base. Disregard all the above, it eventually works through some tweaks and minor syntax modification. Well, not a bad solution after all.