How to setup Gmail POP in Outlook? How to setup Gmail IMAP in Outlook?
A majority of users are used to using Gmail on browsers.
However, there are occasions integrating Gmail accounts into Outlook
user-interface is more convenient. Thus, we do not need to flip between Outlook
and browser while working on mails between accounts under Outlook.
Most users may wonder why Gmail cannot be easily configured in
Outlook lately? Recently, Gmail, iCloud and Yahoo! mail have implemented an additional security feature that require users to enter a second
password for any third-party application including Outlook that is trying to
access their email, calendars, contacts and tasks information.
It is called 2-step verification. You must enable it in order to use Gmail under Outlook.
Here is how to enable it:
Here is how to enable it:
Log in your Gmail and go to Account / Security / Password. Click on Setup next to 2-step Verification. Right there, proceed its following instructions.

1.
In your account’s Google Account page, go to Security
tab at the top and click on Settings
(if it appears Disabled) next to Access
for less secure apps under Account
permissions.Click on radial of Enable next to Access for
less secure apps and Done.

3.
Within Gmail, select Settings from the gear-icon pull-down menu at the top right-hand
side.

4.
Under Settings
page, click on Forwarding and POP/IMAP
tab and turn on POP3 and/or IMAP upon your choice. Shown as below:

5.
How to setup Outlook for Gmail? Go to Outlook,
click on File at top-left and select
Account settings


6.
Manually create a mail profile as usual. On Account Type, choose POP or IMAP according to your preference. Enter password which you just
obtained from 2-step Verification.

7.
Click on More
settings to the right. Click on Outgoing
Server tab and check the box of My
outgoing server (SMTP) requires authentication.
8.
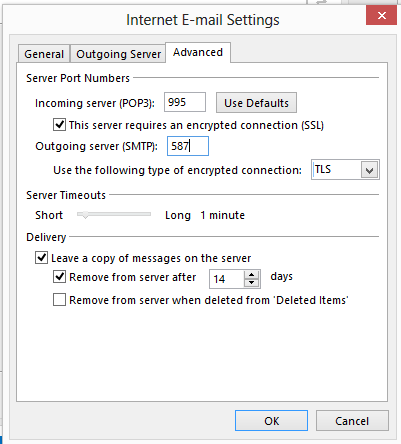
Go to next tab of Advanced, check the box of This
server requires an encrypted connection (SSL) and the port number will
change to 995 for POP and 993 for IMAP.

9.
Then, change Outgoing server (SMTP): to 587 if value of Use the following type of encryption connection: is TLS.
10. change Outgoing
server (SMTP): to 465 if value of Use
the following type of encryption connection: is SSL.
11. Click
OK to exit and OK all the way.
Now we can use Gmail's mail feature in Outlook. But what
about contacts and
calendars? There is an Outlook add-in called EVO Collaborator for Outlook and it is able
to handle this type of 2-steps verification process in Gmail,
iCloud and Yahoo!. You can
download it from its official website and try it out.
EVO Collaborator for Outlook is compatible with:
Public contact, calendar, task services such as Gmail, iCloud, Yahoo! and fruux
On-premise CardDAV/CalDAV servers such as EVO Mail Server, Mac OS X Server,
OwnCloud and Zimbra
After ECO installation, any contact, calendar and task items
created by other means of
mobile devices or web-based interface will be synced
to Outlook and vice versa.
For all items before ECO installation, you may manually
select items and upload them to
your CardDAV/CalDAV account.
I think it is worth every penny of it.
Please refer to the following links on how to sync popular
CardDAV/CalDAV services
with Outlook 2007, 2010, 2013, 2016 or 2019.
3. Sync Mac OS X, Zimbra or OwnCloud with Outlook
No comments:
Post a Comment